1. Installation & Setup
Step 1: Install from Chrome Web Store
- Open the WebGrasp Chrome Web Store page.
- Click the "Add to Chrome" button.
- A small box will pop up; click "Add extension".
Step 1: Click Add to Chrome
Step 2: "Pin" WebGrasp for Easy Access
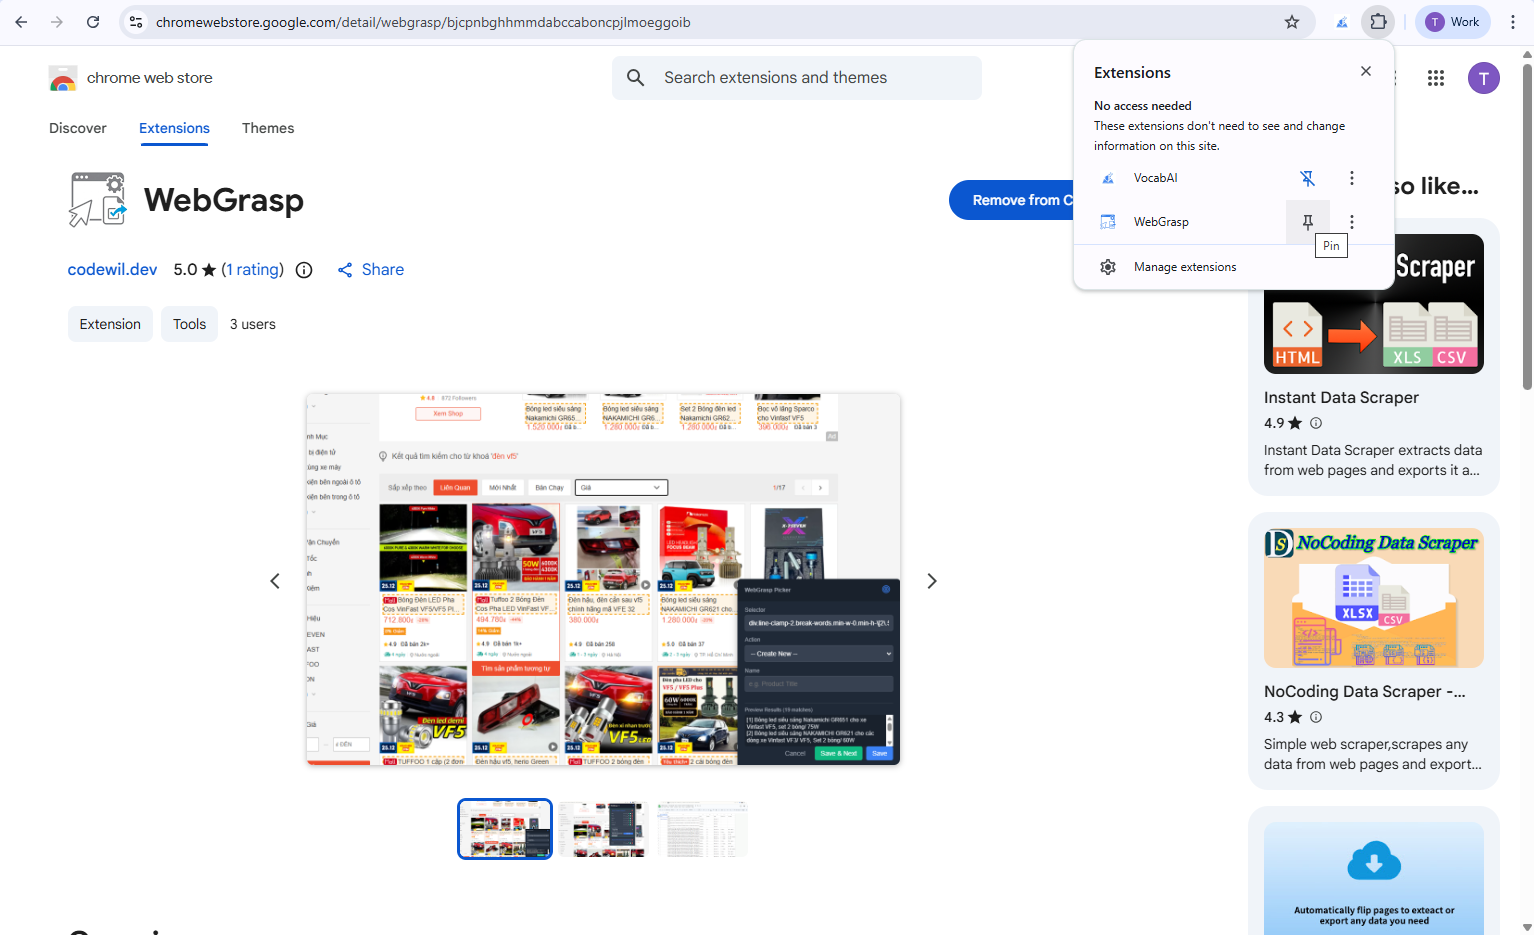
Chrome hides new extensions by default. Let's fix that:
- Click the Puzzle Piece icon in the top-right corner of your browser.
- Find WebGrasp in the list.
- Click the Pin icon next to it.
- Now, the WebGrasp icon will always be visible next to your address bar!
Step 2: Pin WebGrasp via Puzzle Piece icon
2. How WebGrasp Works
WebGrasp allows you to select specific information on a website (like a product price, a news title, or an email address). You save these selections into "Actions" so you can extract them whenever you visit that page or share them with others.
3. Extracting Your First Piece of Data
WebGrasp provides two easy ways to start picking elements from any webpage.
Method A: Selection Shortcut
- Go to any website (e.g., an online store).
- Use your mouse to highlight the text you want to extract.
- A small blue [+] button will appear right above your selection.
- Click that [+] button to open the Picker Tool.

Highlight text to see the [+] icon
Method B: Using the Target Icon
- Click the WebGrasp icon in your browser bar.
- Click the Target icon target in the top right of the popup.
- The Picker Tool will open at the bottom of your webpage.
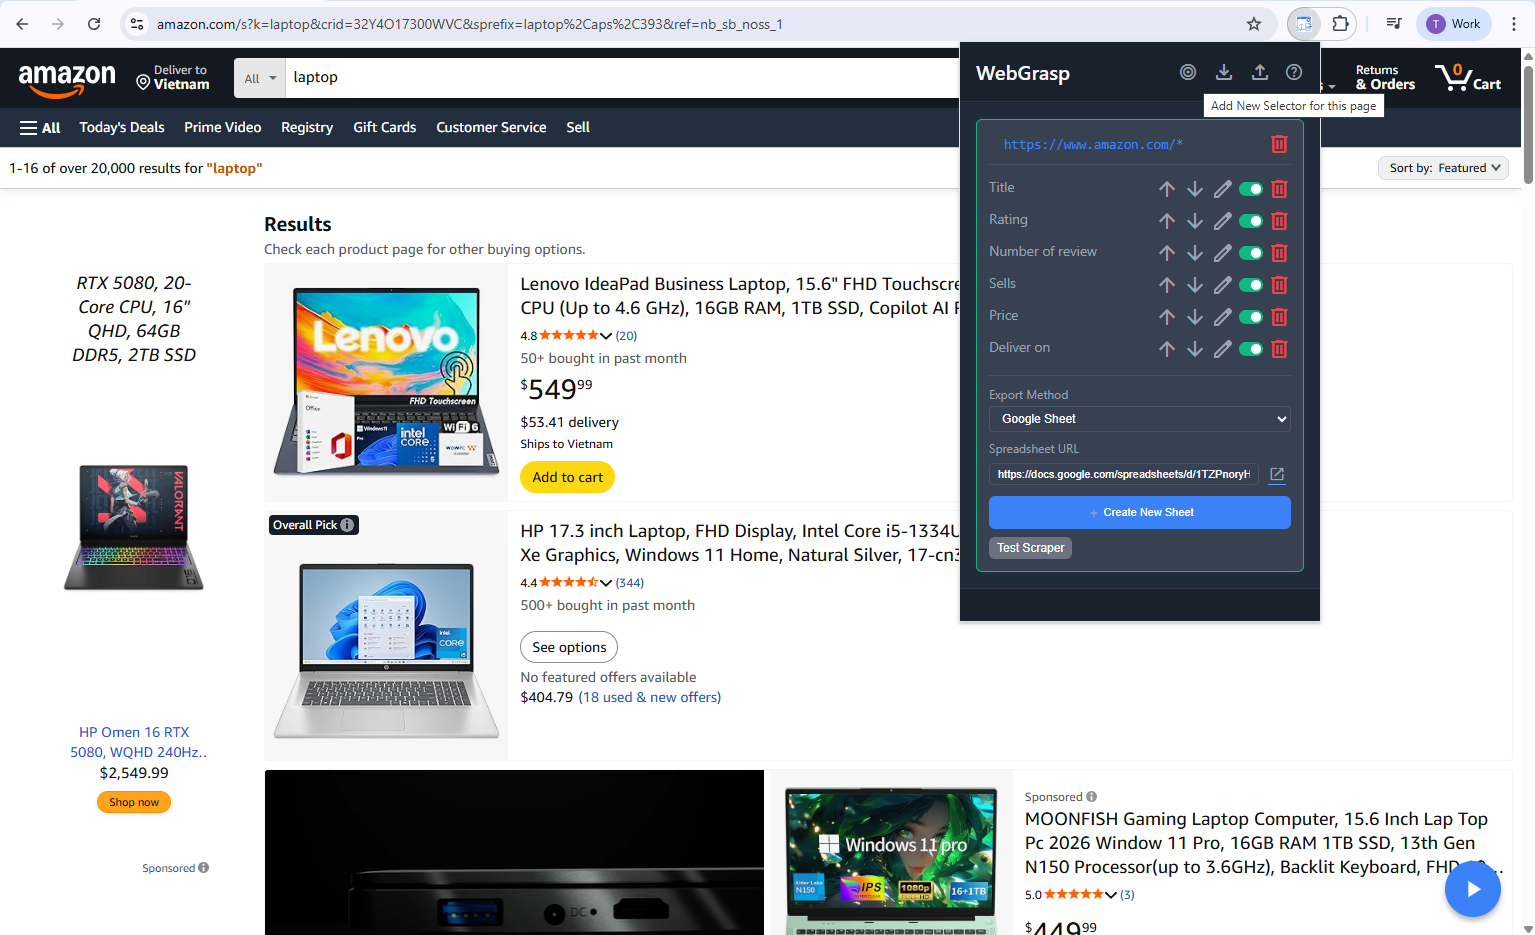
Popup Action Icons: Target, Download, Upload, Help
4. Using the Picker Tool
When the Picker Tool opens, you'll see a small panel:
- Selector: The CSS selector for the chosen element (automatically generated but editable).
- Action: Choose "Create New" or select an existing action name to append this selector to it (grouping data together).
- Name: Type a name for this data (e.g., "iPhone Price").
- Preview: Look at the "Preview Results" box at the bottom. It shows you exactly what text WebGrasp sees.
- Save & Next: Click this to save the current item and immediately pick another one.
- Save: Click Save to finish and close the picker!
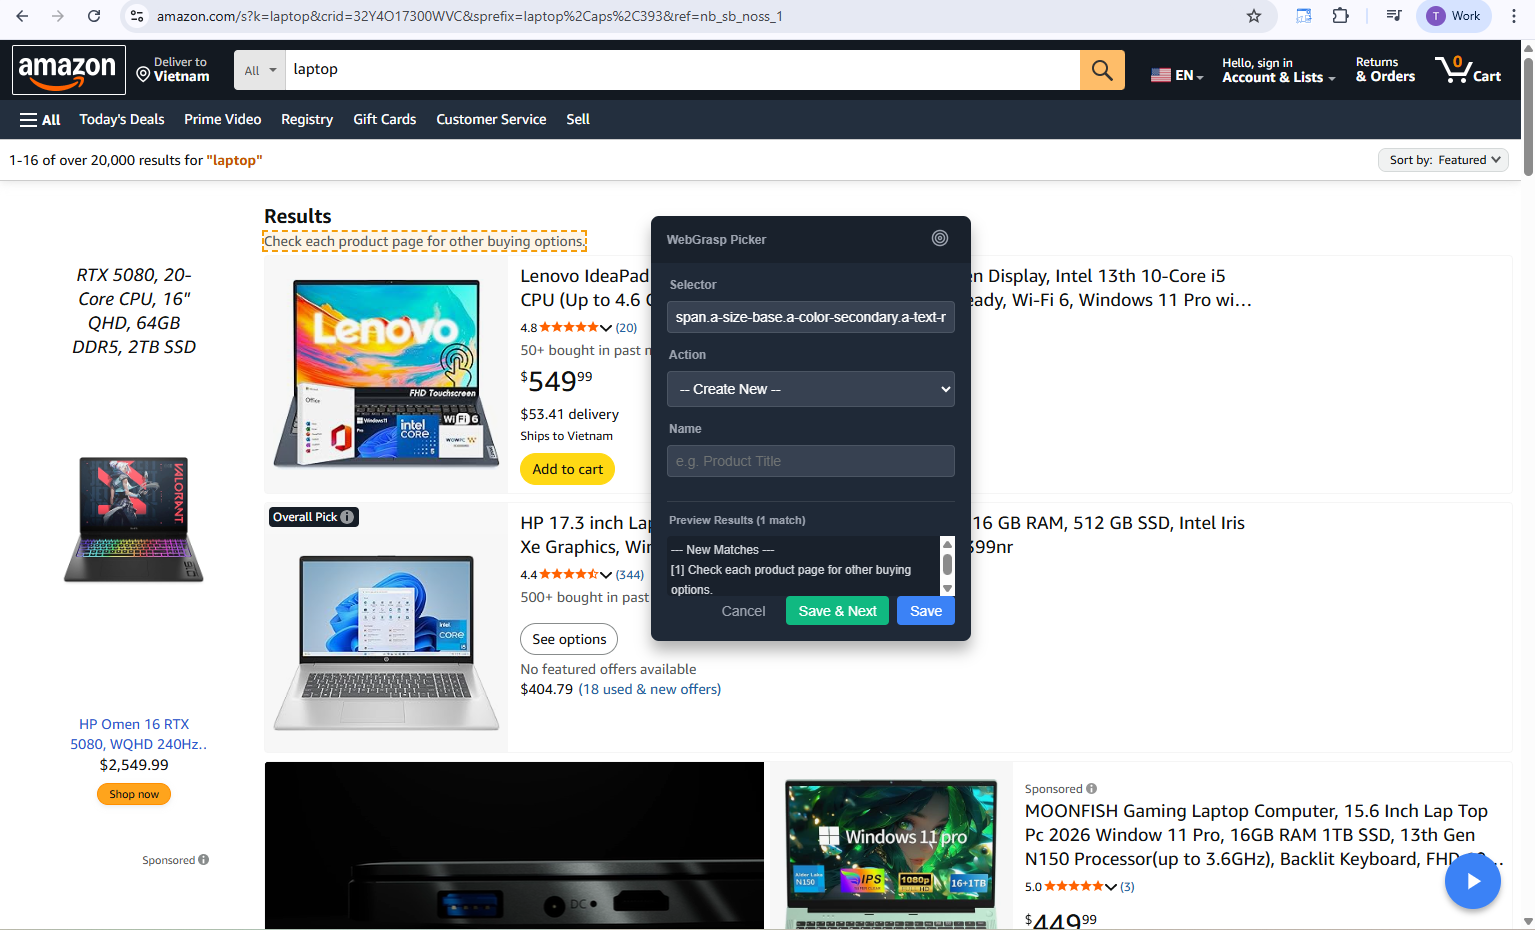
Picker Tool Panel Detailed
5. Advanced: Hopper Mode
Sometimes it's hard to click exactly what you want. Hopper Mode lets you "hop" through the website structure using your keyboard.
- In the Picker Tool, click the Target icon target in its top bar.
- A blue box will appear saying "Hopper Mode Active" with hotkey tips.
- Point your mouse at anything on the page.
- Use these Keys to refine your selection:
- [+] Key: Select the "container" or "parent" (makes the selection bigger).
- [-] Key: Select a smaller piece inside (makes the selection smaller).
- [Enter] Key: Lock the selection so you can type the Name and Save.
- [Esc] Key: Close the picker.
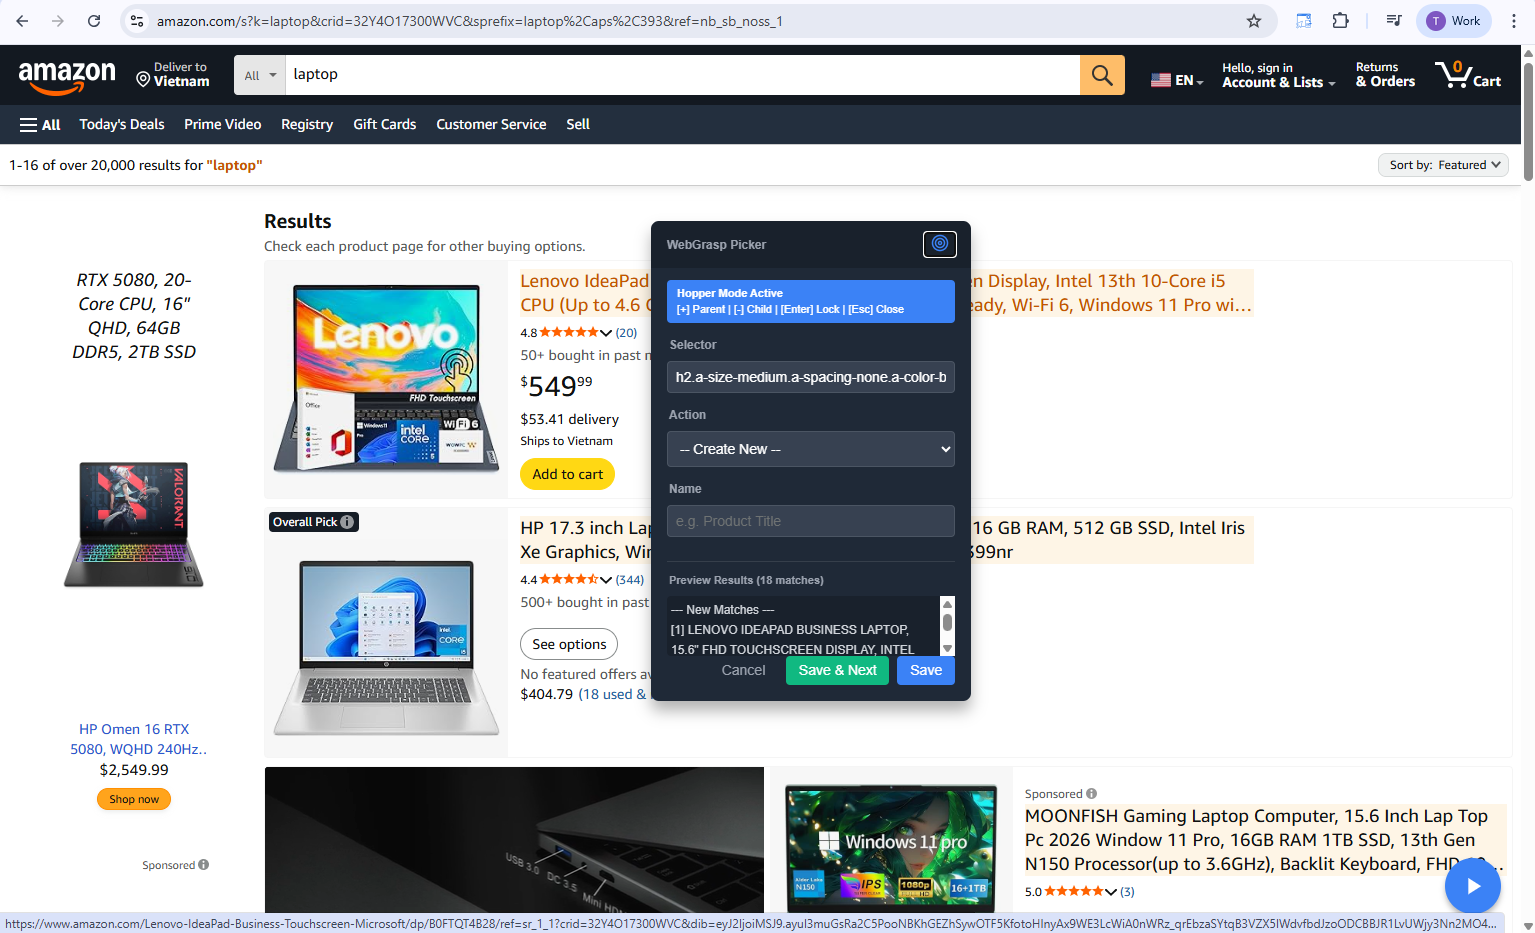
Hopper Mode Hotkey Guide
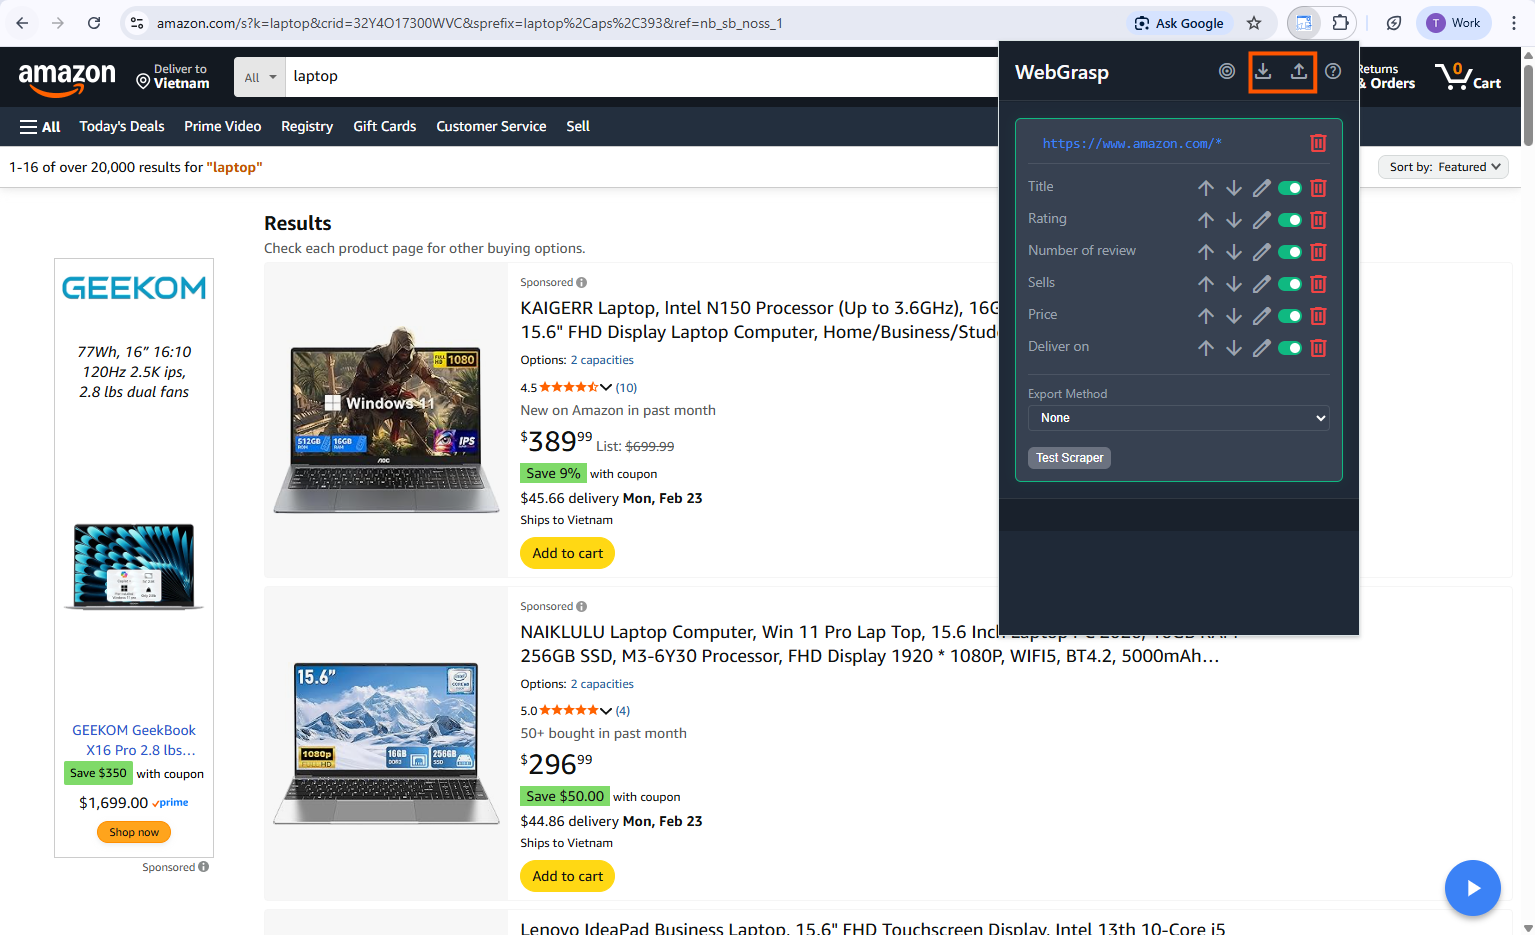
6. Managing Your Selectors
Once you've saved selectors, you can manage them in the WebGrasp popup:
- Click the WebGrasp icon in your browser.
- In each configuration, you can:
- Toggle (Switch): Enable or disable a specific selector.
- Edit (Pencil): Change the name or selector value manually.
- Move (Arrows): Change the order of selectors (this changes the order in your exported data).
- Delete (Trash): Remove a selector or a whole configuration.
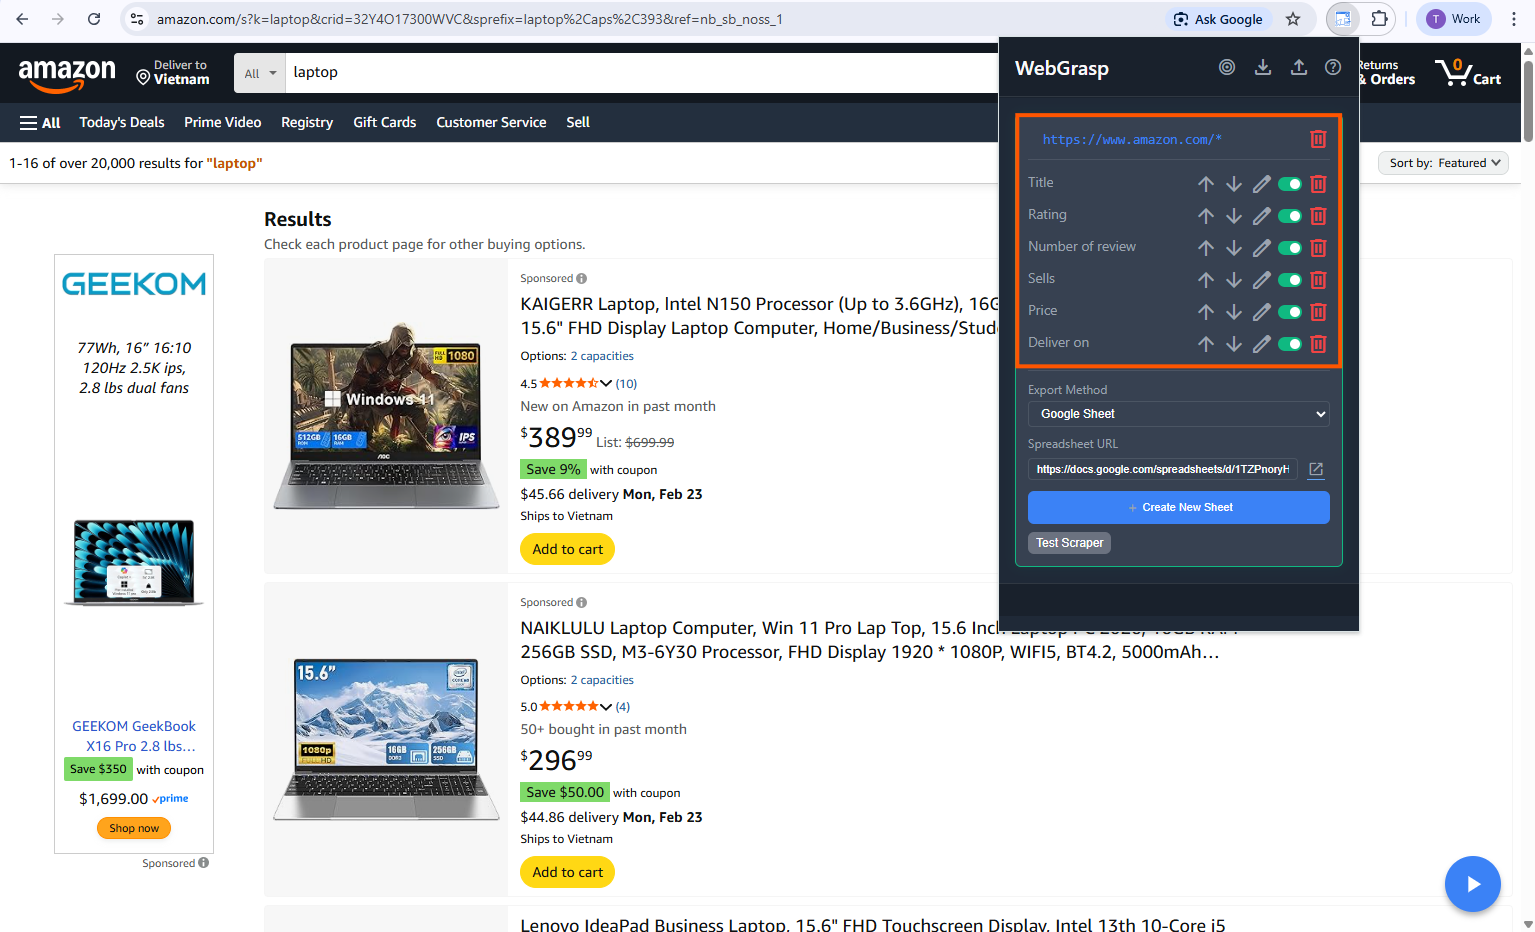
Selector List: Toggle, Edit, Order, Delete
7. Running & Testing
There are two ways to see your data in action:
The "Test Scraper" Button
In the popup, click Test Scraper next to any configuration. This will immediately scan the page and show you a table of all matching results.
The Floating Play Button
When you visit a page that matches one of your configurations, a small blue Play Icon will appear in the bottom right corner. Click it to run the extraction:
- If Export Method is set to None, a Results Modal will open on the page showing your data.
- If an export method is configured, the data is sent automatically and a success notification will appear.
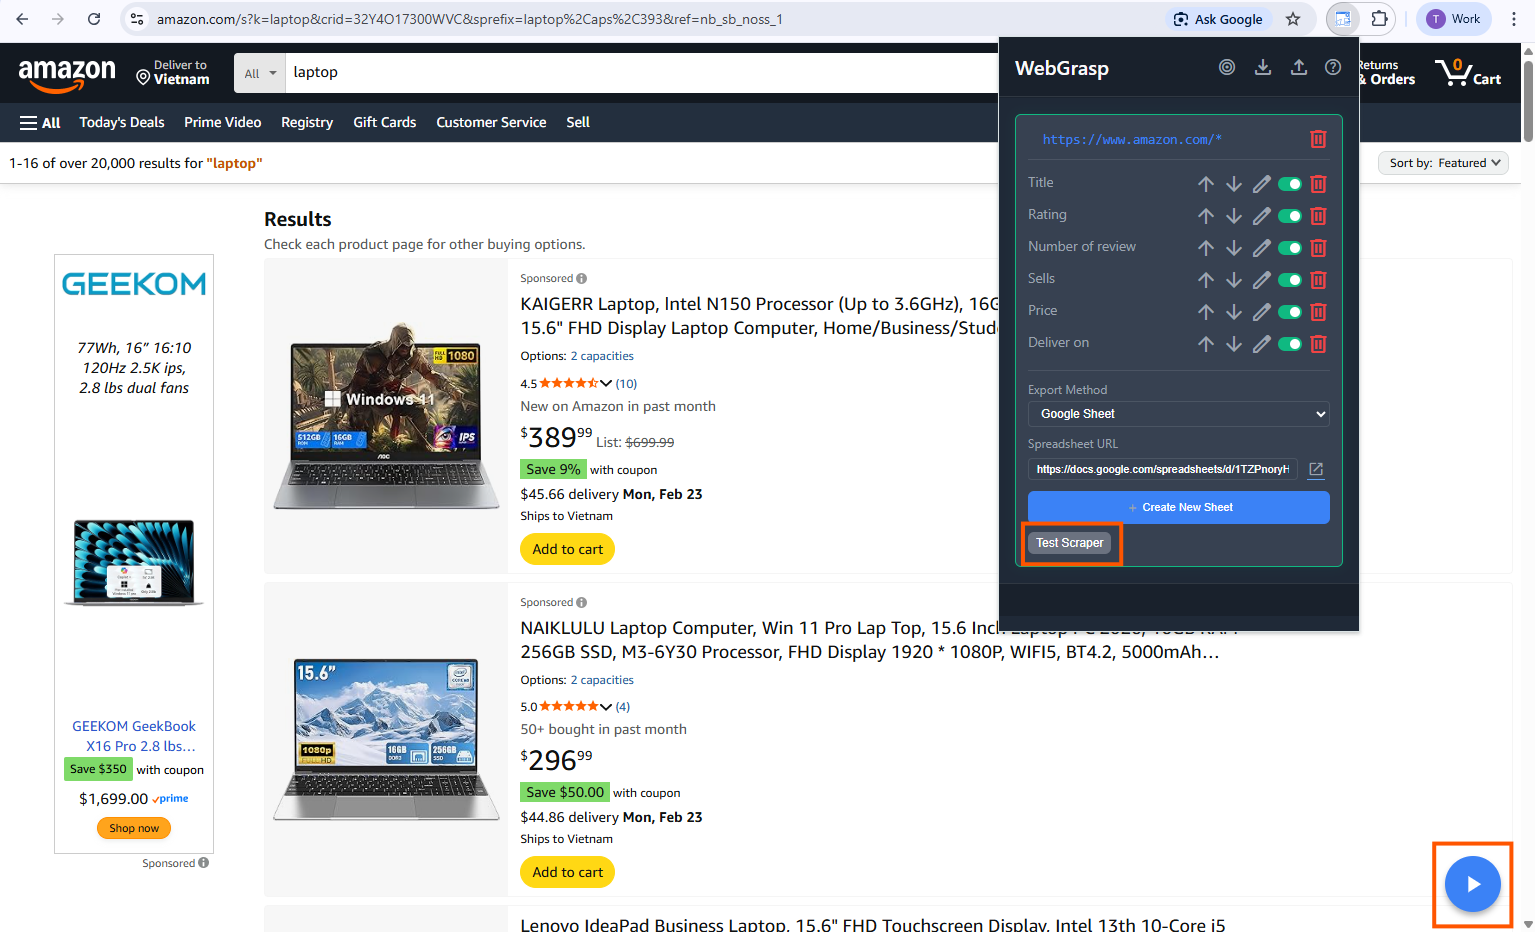
Test Scraper Button & Play Icon
8. Exporting Data
WebGrasp can send your data to different places. You can configure this per configuration in the popup:
1. None
Just view results in the table without sending them anywhere.
2. Google Sheets
- Select "Google Sheet" in the Export Method dropdown.
- Click Create New Sheet to start a fresh file.
- WebGrasp will automatically append data whenever you run the scraper.
3. Webhook
- Select "Webhook" and paste your URL (e.g., from n8n or Zapier).
- Data will be sent as a JSON POST request.
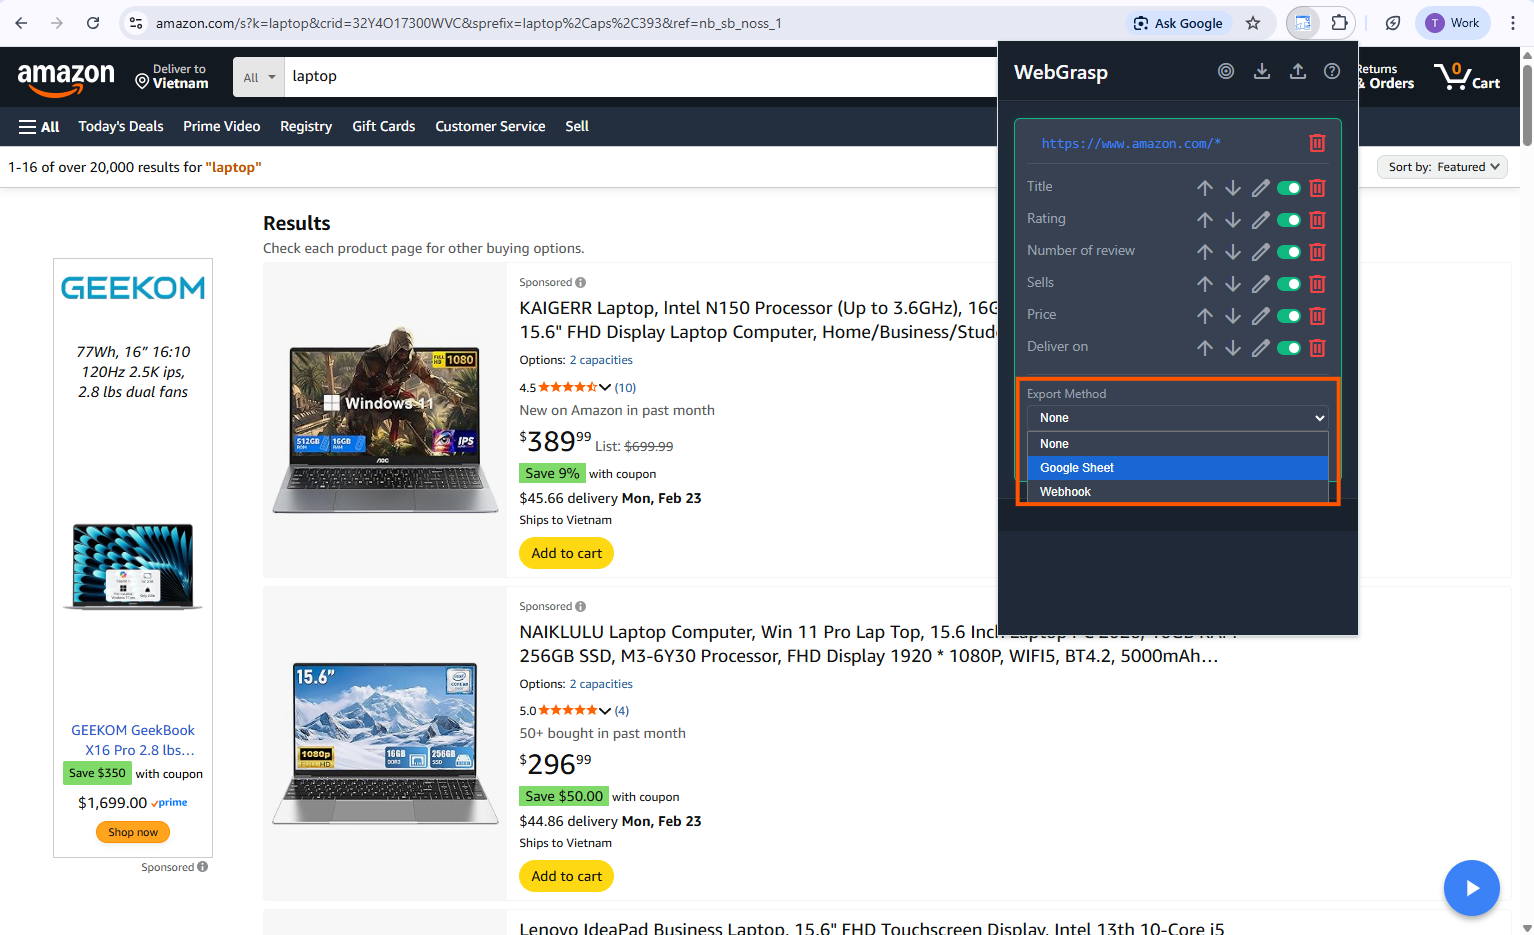
Export Methods
9. Backup & Sharing
Manual Backup (Import/Export)
To share configurations (not the data itself) with friends:
- Click the Download icon download in the popup header to export your JSON settings.
- Click the Upload icon upload to import settings from a file.
Configuration Backup UI
Pro Tips
- Always Check Preview: If the preview shows nothing, WebGrasp might be looking at the wrong part of the page. Use Hopper Mode to fix it!
- Names Matter: Use clear names like "Product_Title" or "User_Email" so you don't get confused later.
- Reload the Page: If the extension feels stuck, just refresh the website (F5) and try again.